How to Recover Data Under macOS 10.13 High Sierra or macOS 10.14 (Mojave)
macOS High Sierra (macOS 10.13) is a popular and very reliable file system. However, data loss is still unavoidable in this system. The macOS 10.13 High Sierra version was released in September 2017. It is the first macOS system to use the new Apple File System (APFS). Therefore, data recovery on macOS 10.13 High Sierra is slightly different from data recovery on other OS X or macOS operating systems. In this article, you will learn how to recover data on macOS High Sierra (macOS 10.13).
Due to macOS High Sierra (macOS 10.13) and the latest macOS requirements, Mac users are not allowed to access the internal system drivers from any application. If you want to recover data from a system disk on macOS 10.13 (High Sierra) or macOS 10.14 (Mojave), firstly, you should find Mac data recovery software that is compatible with macOS High Sierra and can handle various data loss issues under macOS High Sierra 10.13. Mac-Data-Recovery's family of data recovery products is the data recovery application you need. It provides a secure solution to help Mac users recover deleted or lost photos, music, word, excel, powerpoint, etc. on macOS High Sierra (macOS 10.13).
There may be many reasons behind the loss of data in macOS 10.13 High Sierra. Upgrading Mac OS without taking necessary precautions such as backups can result in the loss of critical data, images and files. If you are restoring data from a system disk on macOS 10.13 (High Sierra) or macOS 10.14 (Mojave), disable System Integrity Protection before running the Mac-Data-Recovery family of products. If you recover lost data from an external device, you do not need to disable it.
How to Recover Data Under macOS 10.13 High Sierra or macOS 10.14 (Mojave)
Mac OS 10.13/10.14 users must disable SIP (System Integrity Protection) on Mac firstly before you start to recover lost data. It is an easy operation on Mac, please follow these steps.
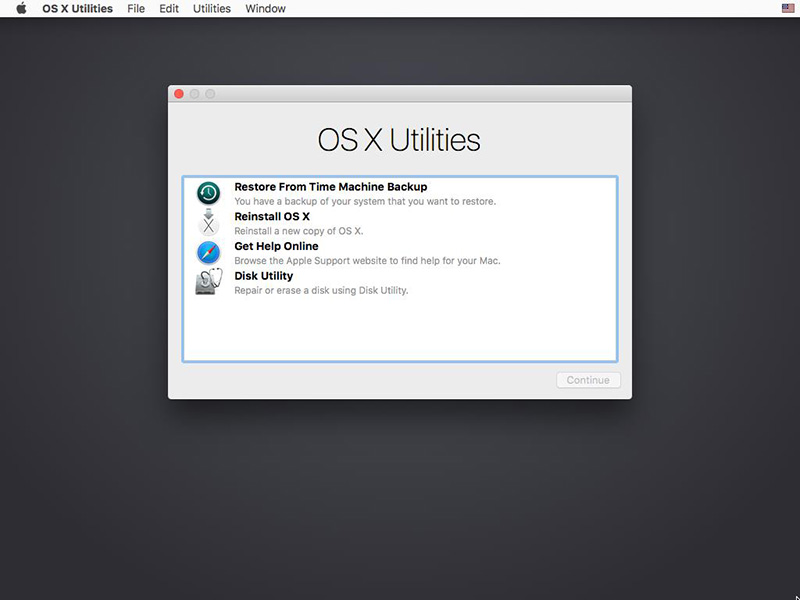
Step 1: Firstly, go to reboot the Mac and press "Command + R" keys simultaneously after you hear the startup chime, then you will boot OS X into "Recovery Mode".

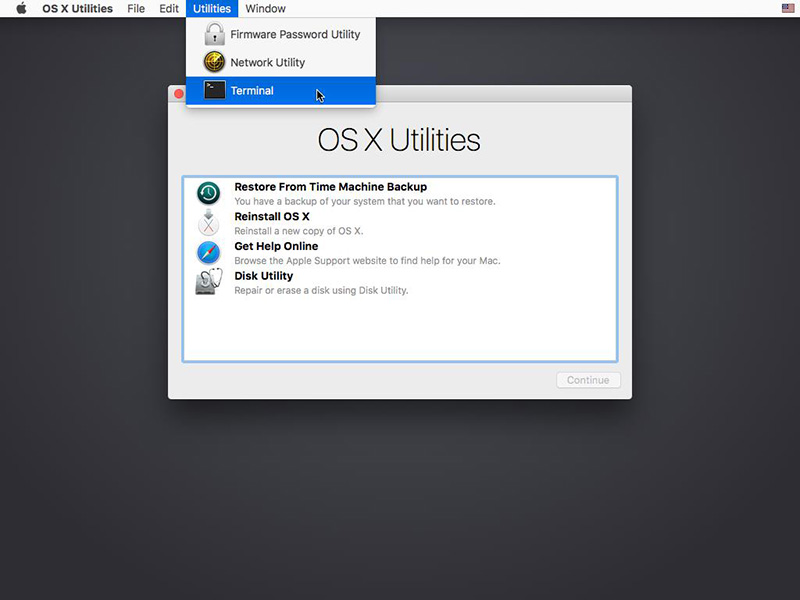
Step 2: Then you will get the "OS X Utilities" window, you need to press the "Utilities" menu at the top of the window, and choose "Terminal" option from the drop down box.

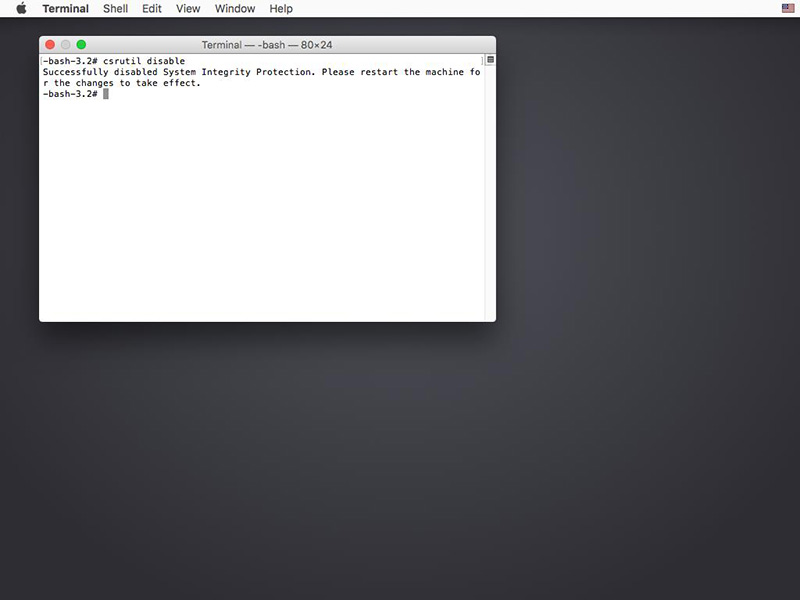
Step 3: Now you are in the "Terminal" window, type in "csrutil disable" and press "Enter", you will get the information that you have successfully disabled System Integrity Protection, then restart your Mac to start to recover lost data from macOS High Sierra.

If your Mac system is from 10.12~10.6, you can start from "Step 4" directly and you do not need to disable SIP on Mac.
Step 4: Download and install Mac Any Data Recovery Pro. After installation, it opens up this dialogue box. In the window of the program, click selects the file types which you want to recover. Detailed steps here >>

